Use the one-line installer if you want the fastest setup. Use the binary or source build paths if you prefer to control the install manually.
Install Clipshot
One-liner (recommended)
With pair code (works with or without account):
curl -fsSL https://clipshot.cc/install.sh | bash -s -- --code=482917
Get the code from another device: clipshot pair or GUI → Pair device → Generate code.
Without pair code (share link):
curl -fsSL https://clipshot.cc/install.sh | bash -s -- --uri='clipshot://node/...'
Install only (connect later):
curl -fsSL https://clipshot.cc/install.sh | bash -s -- --headless --no-autostart
clipshot pair 482917        # join using 6-digit code from another device
clipshot pair               # or generate a new code on this device
clipshot setup              # create account in browser (optional)
What the installer does:
- downloads the correct binary for your OS and CPU
- installs it to
~/.local/binand adds it to your PATH - pre-configures
~/.config/clipshot/settings.tomlwith the hub and relay URLs - installs a background service with auto-start on boot (systemd on Linux, launchd on macOS)
- starts the daemon and waits for it to be ready
- pairs AFTER the daemon is running —
clipshot pairuses DaemonClient IPC (localhost HTTP) to communicate with the daemon, so the daemon must be up first - enables PID lock — only one daemon instance can run at a time
Installer options:
--code=CODE— 6-digit pair code from another device (e.g.482917)--uri=URI— share link from another device (no account needed)--port=PORT— daemon port (default 19231)--hub=URL— hub URL (default https://clipshot.cc)--dist=URL— override download base URL--headless— bare binary only (no DMG/GUI)--no-autostart— skip service creation
Supported platforms:
- Linux
- macOS
For Windows, use the binary download method below.
If you download the binary manually or build from source, pairing and service setup are not automatic. Run clipshot setup to create an account or clipshot pair 482917 to join an existing group, then clipshot service install to set up auto-start.
Auto-start behavior
By default, Clipshot starts automatically on boot:
| Install method | Linux | macOS | Windows |
|---|---|---|---|
One-liner (curl \| bash) | systemd user service + linger | launchd agent (RunAtLoad + KeepAlive) | — |
| GUI app | .desktop in ~/.config/autostart/ | Login Items (via System Events) | — |
| Manual binary | run clipshot service install | run clipshot service install | manual |
To skip auto-start during install:
curl -fsSL https://clipshot.cc/install.sh | bash -s -- --no-autostart
To toggle auto-start from the GUI, go to Settings → General → Start at login.
PID lock: only one daemon can run at a time. If you try to start a second instance, it will exit with “Another clipshot daemon is already running”.
Download binary
Download the binary that matches your machine:
clipshot-linux-x64clipshot-macos-x64clipshot-macos-arm64clipshot-windows-x64.exe
What happens next:
- On a desktop system with a display, running
clipshotopens the GUI. - On a headless machine, run
clipshot daemonto start the background sync service.
Build from source
If you prefer to build Clipshot yourself:
git clone <repo>
cd clipshot
cd web && bun install && bun run build && cd ..
cargo build --release
Headless build (no GUI):
cargo build --release --no-default-features --features headless
System requirements
| Platform | Clipboard tool | Notes |
|---|---|---|
| Linux X11 | xclip | Required for clipboard access |
| Linux Wayland | wl-clipboard | Required for clipboard access |
| Linux Wayland hotkey | XWayland recommended | Global hotkey support is limited on pure Wayland |
| macOS | pngpaste recommended | Strongly recommended for images |
| Windows | none | Built-in clipboard support |
Notes:
- On macOS,
pngpasteis highly recommended. Without it, copied images can become huge raw TIFF files and may fail to sync. - On Linux, if clipboard tools are missing, file sync may still work but live clipboard sync will not.
macOS permissions
The desktop GUI requires two macOS privacy permissions for hotkeys to work:
| Permission | Why | Where to grant |
|---|---|---|
| Input Monitoring | Global hotkey listener (Cmd+Shift+S, Cmd+B) | System Settings → Privacy & Security → Input Monitoring |
| Accessibility | Simulates Cmd+V paste after Cmd+B | System Settings → Privacy & Security → Accessibility |
When either permission is missing, an amber banner appears at the top of the app with an Open Settings shortcut and a Restart button. Grant both permissions and restart Clipshot.
Headless daemon mode (clipshot daemon ...) does not require these permissions.
First launch
If Clipshot has no group token yet, it opens the Welcome Screen instead of the full dashboard.
Welcome Screen
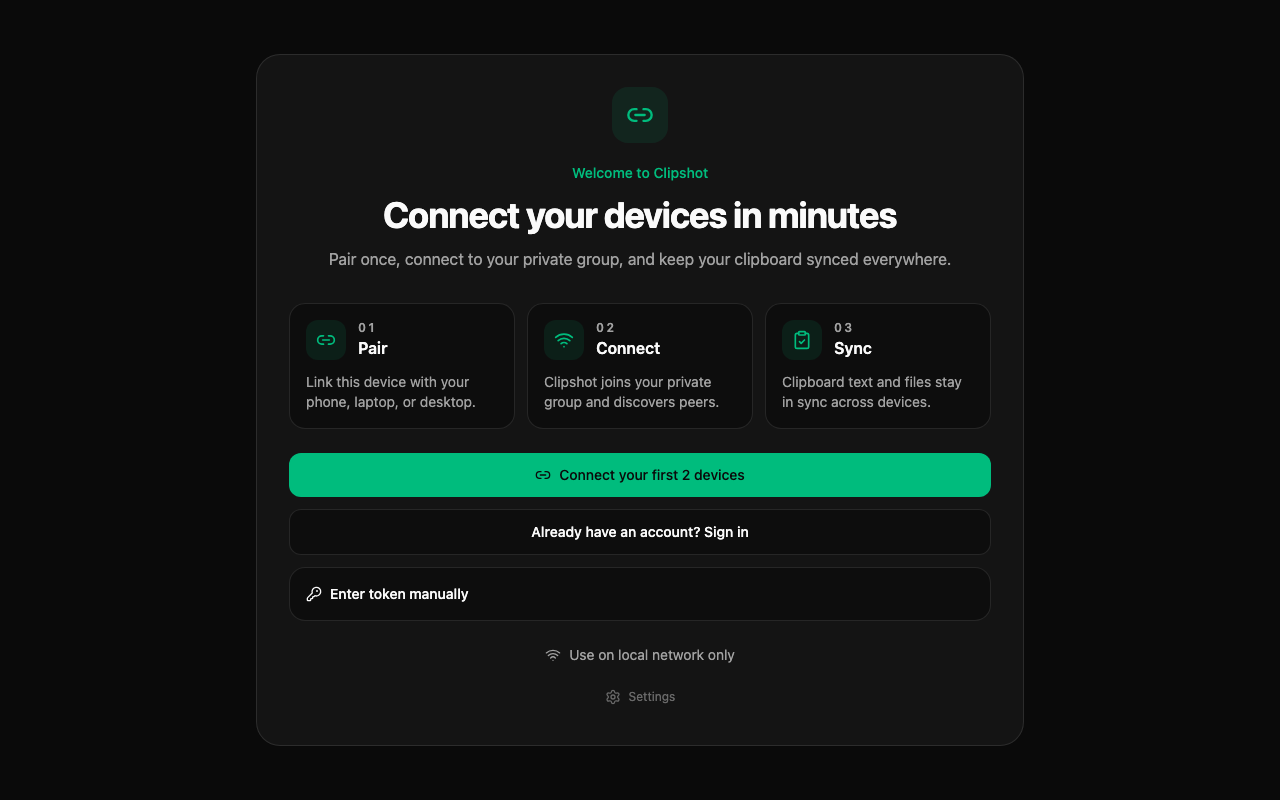
The Welcome Screen shows:
- a short 3-step intro: Pair → Connect → Sync
- a primary button: Connect your first 2 devices — opens the Pair dialog
- a secondary link: Already have an account? Sign in — navigates to Settings to enter credentials
- a collapsible section: Enter token manually
- a link: Use on local network only — skips account setup, enables local-only mode with mDNS discovery
- a link: Settings
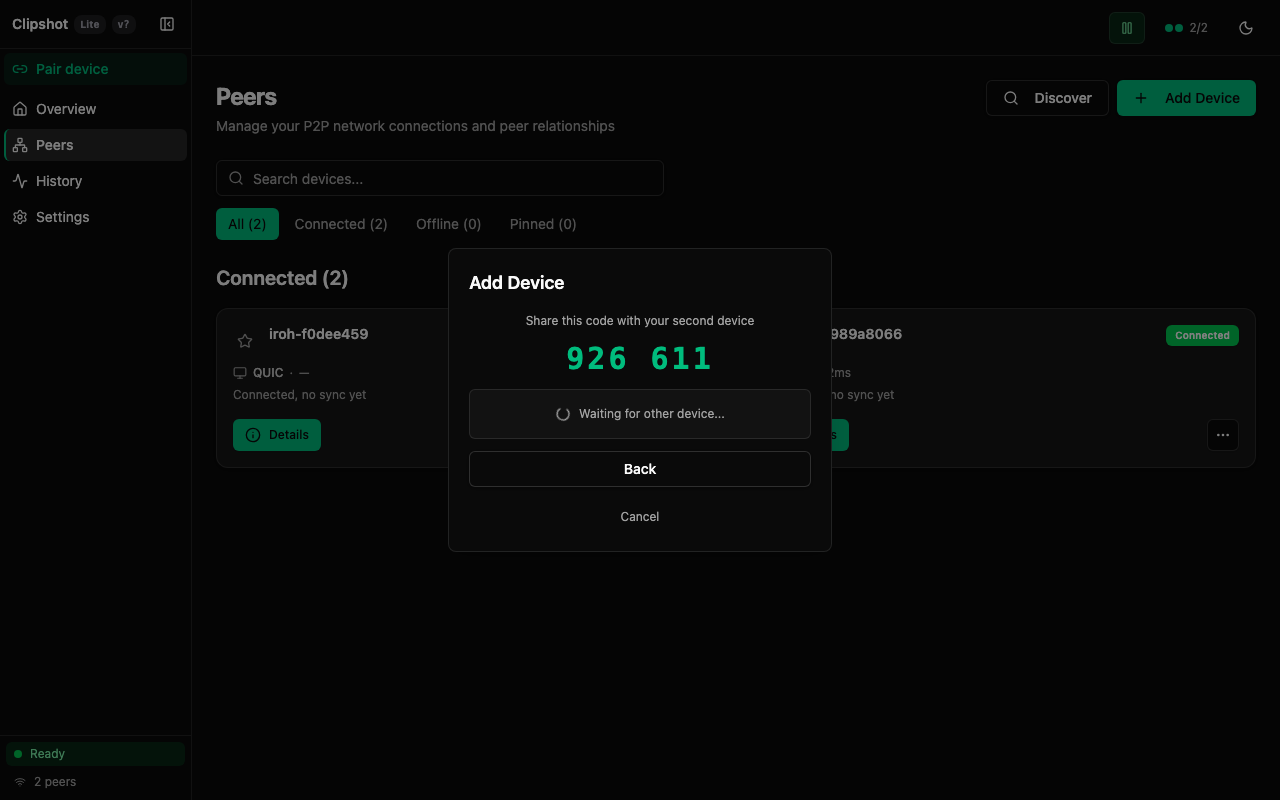
The image above shows the Welcome Screen with the Add Device dialog open. The dialog has two buttons: Generate code and Enter code.
This screen is for joining an existing Clipshot group or creating a new account.
Pairing your first device
Step 1 — Open the Pair dialog
Click Connect your first 2 devices on the Welcome Screen (or Pair device in the sidebar if already set up). The Pair dialog opens.
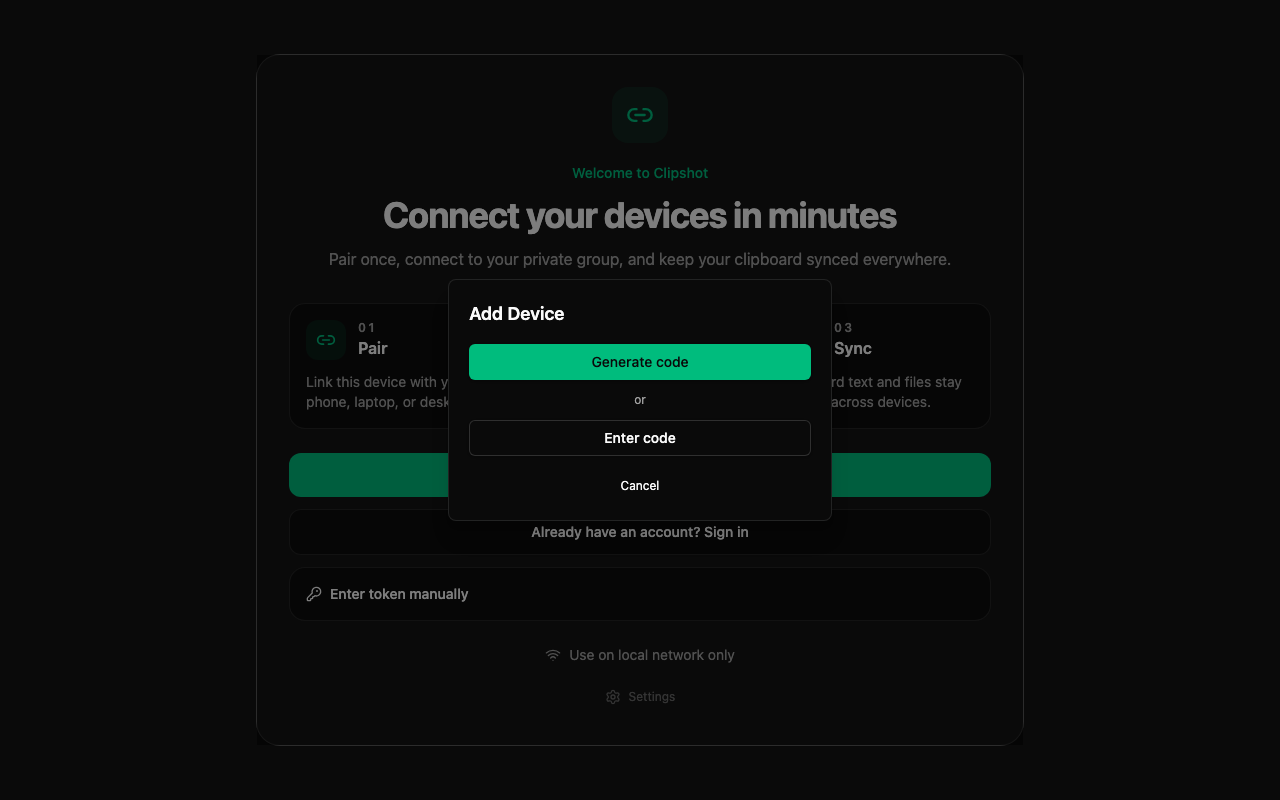
The dialog has two buttons:
- Generate code — creates a 6-digit code on this device, valid for 5 minutes.
- Enter code — type the 6-digit code from another device.
Step 2 — Generate a code
On one device, click Generate code. The dialog shows the code and waits.
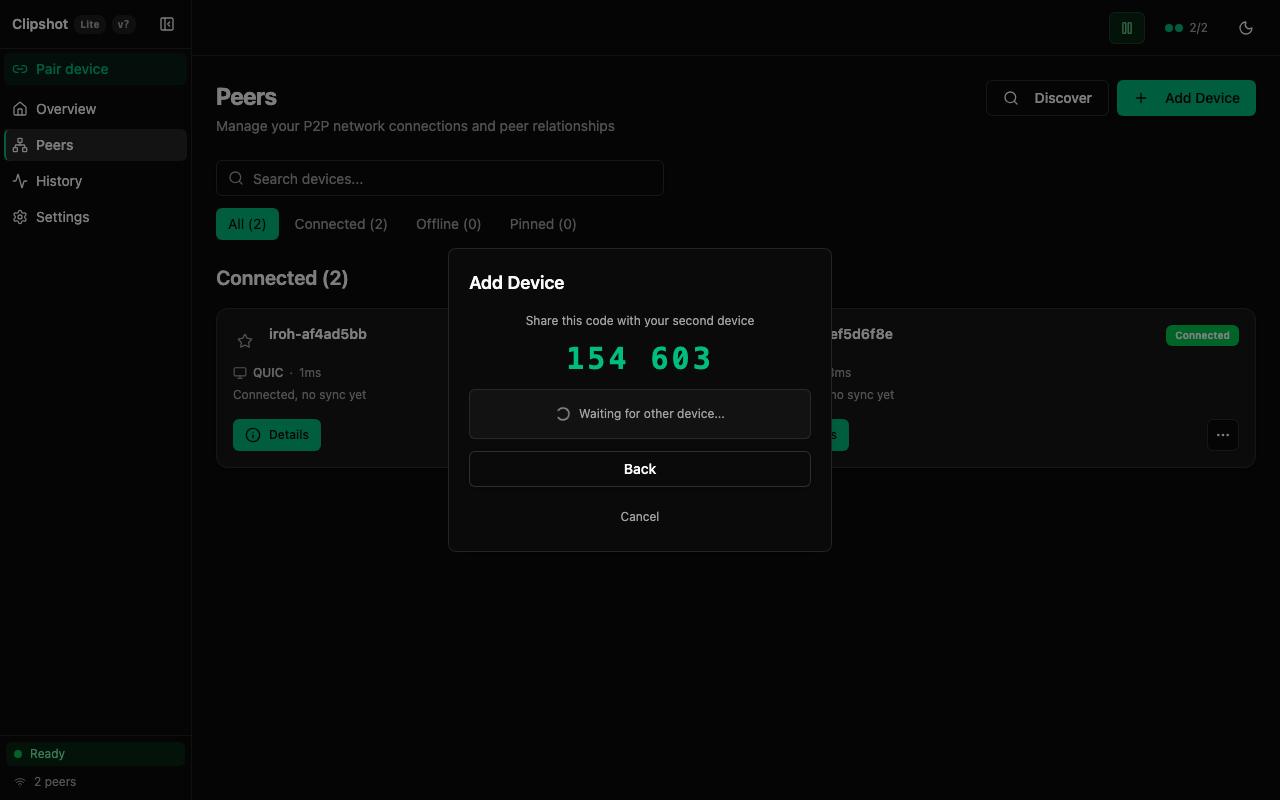
Step 3 — Enter the code on the second device
On the second device, click Enter code, type the 6 digits, and click Join.
Step 4 — Compare confirmation digits
Both devices show 4 confirmation digits derived from a Diffie-Hellman key exchange.
- Digits match → click Yes, they match on both devices. ✓
- Digits differ → click No and start the pair flow again.
Step 5 — Connected
After confirmation, both devices are connected and clipboard sync starts automatically.
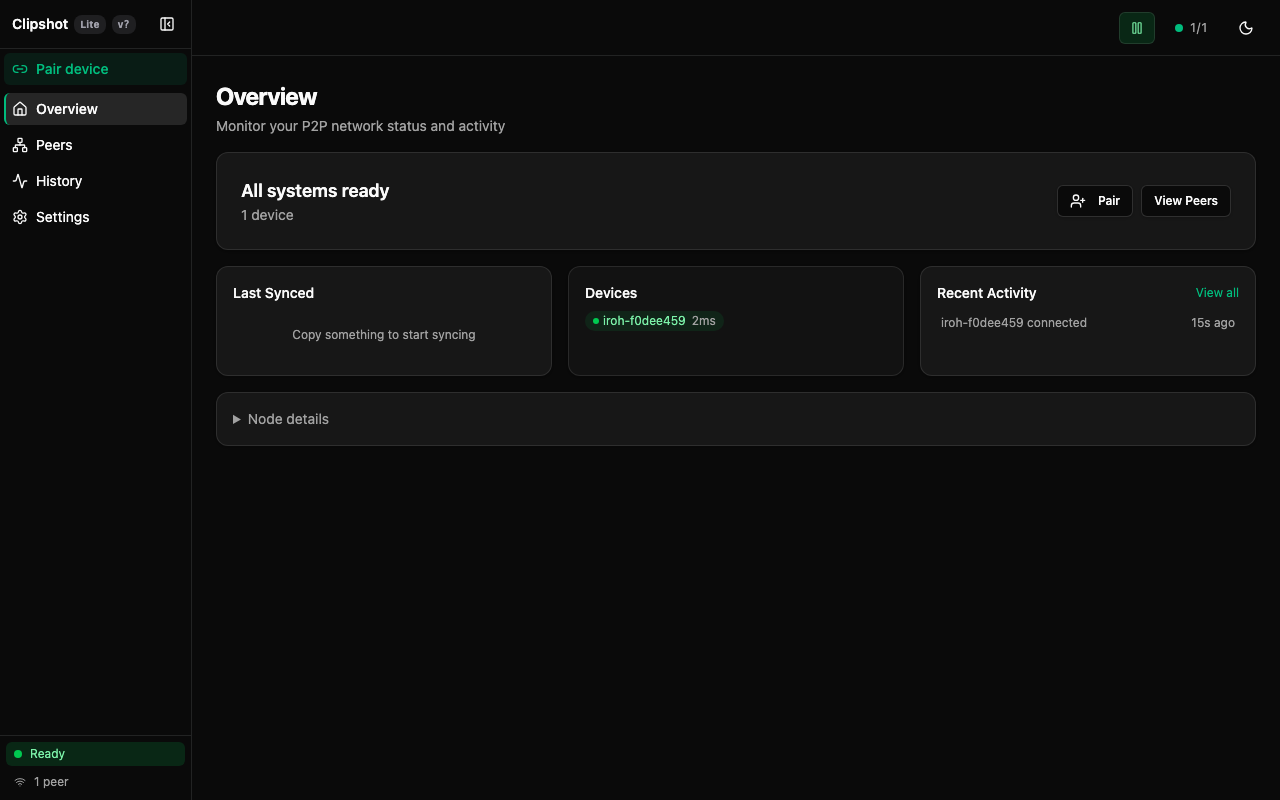
Adding more devices: click Pair device in the sidebar on any connected device and repeat steps 2–4. The Peers page shows all connected devices.
Connecting via Portal account (optional)
A Portal account is not required, but it lets your devices auto-discover each other without sharing pair codes after the first setup.
- Run
clipshot setupin a terminal, or click Already have an account? Sign in on the Welcome Screen. -
Your browser opens the Portal setup page.
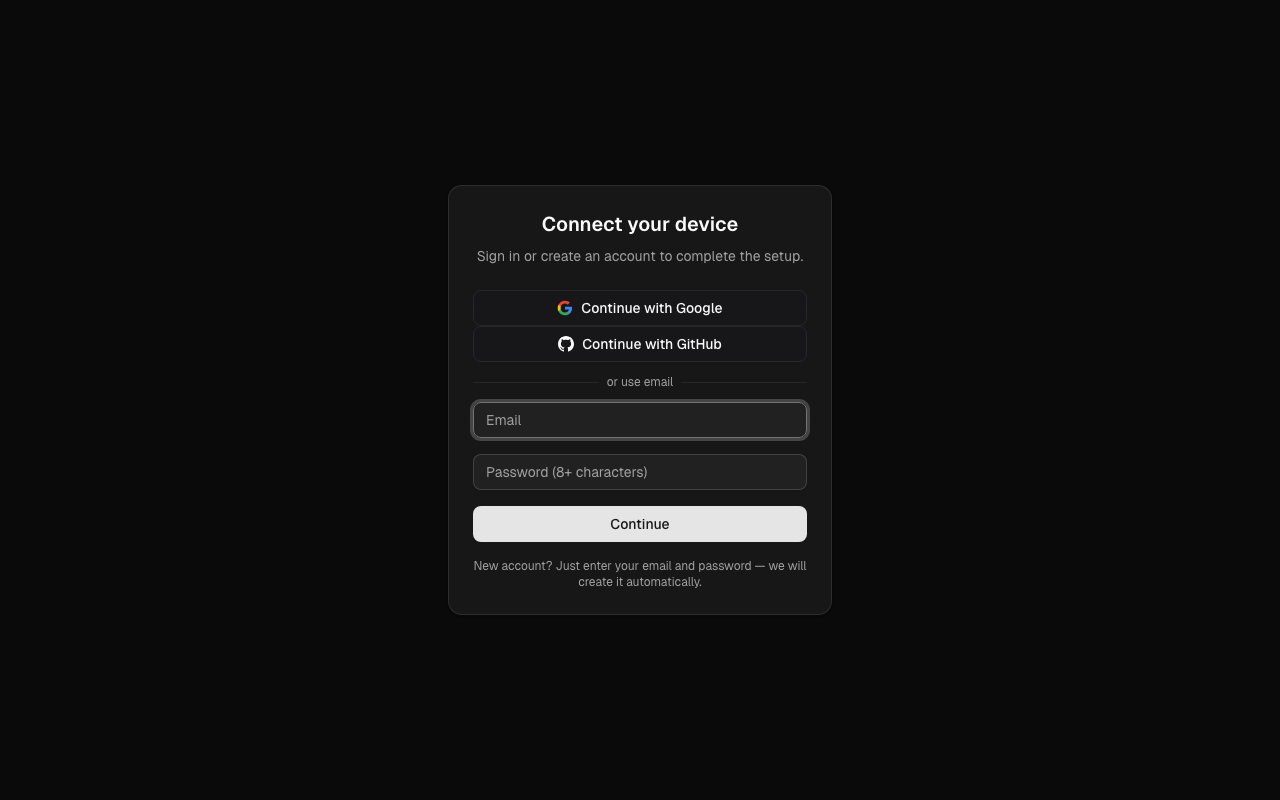
-
Sign in with Google, GitHub, or email.

- Your device is linked to your Portal group. Other devices in the same group reconnect automatically.
Alternative: enter token manually
If you already have a group token:
- Expand Enter token manually.
- Paste your token, usually starting with
clip_. - Click Save token.
- Clipshot restarts and opens the normal app.
Multiple groups
If your account has more than one group, the setup page will show a group picker — choose which group the new device should join. If you have only one group, it is selected automatically.